When it comes to achieving a flawless finish on your walls, the right spackling compound can make all the difference. Whether you’re patching up minor holes or repairing larger damage, choosing the best spackling is essential for seamless results that last. With a plethora of options available in the market, it can be challenging to discern which products truly deliver on their promises. This article will guide you through the top-rated spackling compounds, offering comprehensive reviews and a detailed buying guide to help you make an informed choice.
Understanding the different types of spackling and their specific uses is crucial for both novice DIYers and seasoned professionals. From quick-drying formulas perfect for fast repairs to lightweight options that make application effortless, we’ve compiled the best spackling products that cater to various needs. Join us as we explore the top contenders, ensuring your next home improvement project achieves an impeccable finish that enhances the beauty of your living space.
Before we get to our review of the best spackling, let’s browse through some relevant products on Amazon:


Last update on 2025-12-28 / Paid links / Images from Amazon Product Advertising API
Overview of Spackling
Spackling is a versatile and essential material used in the realm of home improvement and repair. It primarily consists of a paste made from various components, including gypsum, binders, and water. Designed for filling small holes, cracks, and imperfections in walls and ceilings, spackling becomes a crucial part of any DIY home project. Homeowners and professionals alike rely on spackling to achieve smooth, seamless surfaces before painting or wallpapering, ensuring a polished look to their interiors.
The application of spackling is straightforward, making it accessible even for beginners. It typically comes in a tub or tube, allowing users to easily apply it with a putty knife or a similar tool. As it dries, spackling compounds shrink slightly, making it necessary for users to apply multiple layers for deeper holes or larger repairs. The drying time can vary depending on the type of spackling used, with some products designed for quick repair jobs while others are formulated for more extensive applications.
One of the standout features of spackling is its ability to create a strong bond with the surrounding material, which is critical for long-lasting repairs. Most modern spackling compounds are formulated to be lightweight, which not only makes them easy to work with but also reduces the risk of cracking. Additionally, some spackling products are available in different colors or can be painted over once dry, seamlessly blending with the existing surface.
Choosing the best spackling involves considering factors such as the size of the repair, the speed of application, and the type of surface being treated. For small holes from nails or screws, a lightweight spackling compound may suffice, while larger cracks may require a more robust formulation. By selecting the right product for the job, users can achieve professional-quality repairs that enhance the overall appearance and durability of their living spaces.
Top 5 Best Spackling
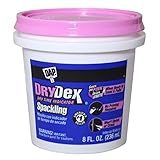
1. DAP 12330 DryDex Spackling
DAP 12330 DryDex Spackling is a versatile and user-friendly product that stands out for its unique color-changing formula. When first applied, the spackling paste appears pink, allowing for easy visibility during application. As it dries, it transforms to a light, sanded finish, indicating that it’s ready for sanding and painting. This feature proves helpful for both amateurs and professionals alike, ensuring that you’re not left guessing whether it’s ready for the next step.
In addition to its color-changing ability, this spackling compound offers excellent adhesion, filling power, and smooth application. It can be used for a variety of surfaces, including drywall, wood, and plaster, allowing for a wide range of repair tasks around the house. Once cured, the finish is paintable and can be sanded down easily for a professional look, making it a top choice for many DIY projects.
2. Red Devil 0541 Onetime Spackling
Red Devil 0541 Onetime Spackling is renowned for its exceptional ease of use and fast drying time. This product is perfect for filling small to medium-sized holes and cracks in drywall, offering a lightweight consistency that glides on smoothly without the need for extensive sanding. Users appreciate how quickly it dries, allowing projects to be completed in a fraction of the time compared to traditional spackling products.
Another standout feature of this spackling compound is its paintability. Once it has dried, it accepts paint well, ensuring that repairs are virtually undetectable once finished. It can also be used in interiors and exteriors, making it a highly versatile option for all types of home repairs. Red Devil’s commitment to quality makes it a reliable choice for both novice DIYers and seasoned professionals.
3. 3M Patch Plus Primer 8 oz
3M Patch Plus Primer is a unique hybrid spackling compound that combines spackling and primer in one convenient product. This innovative approach saves time and simplifies the repair process, as you can apply it and paint directly over it without needing a separate primer. The compound dries quickly, allowing for efficient project completion without sacrificing quality, making it ideal for busy homeowners with a lot on their plate.
Another advantage of this spackling is its easy application and smooth finish. The formula is designed to minimize sanding, which is a major plus for those looking to streamline their home improvement tasks. Once applied, it adheres well to various surfaces, providing a durable repair that can withstand the test of time. This product’s strong performance and user-friendly design make it a go-to choice for anyone looking to tackle wall repairs efficiently.
4. Zinsser 12345 Lightweight Spackle
Zinsser 12345 Lightweight Spackle is recognized for its excellent filling capabilities and lightweight formula, making it easy to work with on a variety of projects. Its smooth texture allows for easy application, and it fills holes and cracks without shrinking or cracking as it dries. This makes it an ideal choice for both delicate repairs as well as larger patch jobs, ensuring that every project comes out beautifully.
Moreover, this spackling compound is paintable in just a short time after application. This quick-drying feature is perfect for those who want to complete a project rapidly without compromising on quality. Zinsser also provides an exceptional blend of durability and ease, which means that once painted over, the repairs blend seamlessly into the existing wall, delivering satisfying and professional results.
5. Evercoat 101596 All-Purpose Putty
Evercoat 101596 All-Purpose Putty is a highly acclaimed spackling compound known for its exceptional versatility and strength. This putty can be used on drywall, wood, fiberglass, and metal, making it suitable for a wide range of applications. It provides impressive filling power for both small blemishes and larger repairs, while its smooth application makes it easy to achieve a professional finish.
What sets Evercoat apart is its excellent durability and resistance to moisture, which is particularly beneficial for repairs in areas exposed to humidity. Once cured, it can be sanded, painted, or stained, allowing for seamless integration with surrounding surfaces. Whether tackling DIY projects, home renovations, or professional repairs, Evercoat 101596 All-Purpose Putty is a reliable choice that consistently delivers high-quality results.
Why Do People Need to Buy Spackling?
Spackling is an essential product for anyone looking to maintain or improve the quality of their walls and ceilings. Homeowners, renters, and DIY enthusiasts alike often encounter small holes, cracks, or imperfections in their drywall that can detract from the overall aesthetic appeal of a space. Spackling provides a simple solution for these issues, allowing individuals to fill in these imperfections quickly and efficiently, making surfaces look smooth and pristine again.
In addition to its cosmetic benefits, using spackling can also protect surfaces from further damage. Over time, gaps and holes can allow moisture to seep into walls, leading to mold growth or structural deterioration. By filling in these spaces with the best spackling, individuals can create a more robust barrier against environmental factors, thereby prolonging the lifespan of their walls and the overall integrity of their home.
Moreover, spackling is a cost-effective solution for home repairs. Whether it’s a minor touch-up or a larger renovation project, purchasing spackling compound is generally affordable compared to more extensive repairs or professional services. This makes it an attractive option for those looking to handle home maintenance on a budget, as it allows for significant savings while still achieving a high-quality finish.
Lastly, the versatility of spackling makes it a crucial item in any toolbox. It can be used not only for drywall repairs but also for filling nail holes, dings in wood, and even for crafting with textured surfaces. With various types and formulations available, spackling can meet different needs and preferences, further solidifying its place as a fundamental product for maintaining a home’s appearance and value.
Common Uses for Spackling
Spackling paste is a versatile compound primarily used for repairing small imperfections in walls and ceilings. Its primary function is to fill holes, cracks, and minor surface defects, providing a smooth surface for painting or finishing. Homeowners often use spackling to address nail holes left from picture frames or hooks, as well as other small dings and scratches that accumulate over time.
In addition to wall repairs, spackling can also be applicable in various woodworking projects. Carpenters and DIY enthusiasts may use it to fill gaps between molding and walls or to treat blemishes in furniture and cabinetry. This adaptability makes spackling an essential item in any crafting or home repair toolkit.
For those concerned with aesthetics, spackling is significant in preparing surfaces for painting. By smoothing out surface imperfections, spackling ensures that paint adheres more evenly and looks better when dried. The result is a cleaner, more polished final appearance in any painting project.
Differences Between Spackling and Joint Compound
While both spackling and joint compound serve similar functions in home repairs, they are formulated differently and suit different applications. Spackling is usually a thicker, faster-drying material intended for small repairs and touch-ups. It is ideal for filling small holes and cracks quickly, making it a popular choice for non-professionals and quick fixes.
On the other hand, joint compound is more suitable for large-scale drywall projects. It typically comes in larger containers and is designed for applying over seams and joints in drywall installations. Joint compound requires more drying time, multiple layers for optimal results, and it is often sanded down for a smooth finish. However, it can be used for larger imperfections and workspaces where a more extensive application is necessary.
Understanding the differences between these two products allows consumers to choose the right solution for their specific needs. Using spackling for small repairs helps ensure a quicker, less labor-intensive process, while using joint compound for broader applications can produce smoother results over larger surfaces.
Tips for Applying Spackling Like a Pro
To achieve the best results when using spackling, proper application techniques are essential. Start by preparing the area you wish to repair by cleaning it thoroughly. Remove any loose debris and dust from the damaged surfaces to create a solid base for the spackling compound. This can significantly enhance adhesion and improve the final outcome.
When applying the spackling paste, use a putty knife for even distribution. It’s advisable to apply the compound in thin layers to avoid excessive buildup, which can be harder to sand and finish. For larger holes or cracks, gradually fill the space, allowing each layer to dry before adding more. This method ensures better adhesion and a smoother finish.
After the spackling has dried, sand the surface lightly to achieve an even texture that matches the surrounding area. Use fine-grit sandpaper and be cautious not to sand away the surrounding wall surface. Finally, wipe the area with a clean cloth to remove any dust before painting. Following these tips can make DIY repairs appear professionally done.
Environmental Considerations When Choosing Spackling
As homeowners become more environmentally conscious, the choice of materials used for home repairs reflects that awareness. When selecting a spackling compound, consider eco-friendly products that minimize harmful emissions and contain natural ingredients. Many brands now offer low-VOC (volatile organic compound) options that contribute to healthier indoor air quality.
Additionally, biodegradable spackling products can be an excellent choice for those aiming to reduce their environmental footprint. These formulas are designed to break down more naturally over time, reducing waste in landfills. Researching brands that prioritize sustainable manufacturing practices and responsible sourcing is also vital for environmentally conscious consumers.
Using eco-friendly spackling compounds doesn’t necessarily compromise quality. Many green products offer comparable performance to traditional spackling options while emphasizing safety for both the user and the environment. By choosing such products, consumers can complete their DIY projects with peace of mind, knowing they are contributing to a healthier planet.
Buying Guide for the Best Spackling
When it comes to home repairs and DIY projects, spackling is an essential product to have on hand. This versatile compound allows you to fill in holes, cracks, and imperfections in walls before painting or finishing. With a myriad of options available in the market, selecting the best spackling can be a daunting task. This buying guide outlines key factors to consider, ensuring you choose the right spackling for your projects.
1. Type of Spackling
There are primarily three types of spackling compounds: premixed, powder, and specialty spackling. Premixed spackling is ready to use straight out of the container, making it convenient for quick repairs. Powdered spackling requires mixing with water before application, which might be appealing to those who prefer customization in terms of consistency and drying time. Specialty spackling products cater to specific needs, such as fast-drying formulas or those designed for use on exterior surfaces.
Choosing the right type for your project will depend on your specific requirements. For large repairs and extensive projects, a powdered spackling might provide the flexibility and volume needed. On the other hand, for quick touch-ups or smaller holes, premixed options are often the best spackling for efficiency.
2. Drying Time
Drying time is a critical factor when selecting a spackling compound. Various products have different drying times, ranging from a few minutes to several hours. If you are working under a tight schedule, look for a fast-drying formula that allows you to complete your project without lengthy waiting periods. Quick-dry spackling typically sets within 15 to 30 minutes, enabling you to sand and paint shortly after application.
However, it’s essential to balance speed with the type of project you are undertaking. For larger areas needing more extensive filling, a longer-drying product may allow for better adhesion and a smoother finish. Consider your timeline and the size of the repair when deciding on the drying time.
3. Sandability
The ease of sanding is another vital factor in choosing the best spackling. After applying the compound, you’ll likely need to smooth it out to achieve a flawless finish. Some spackling products sand down easily and quickly, allowing you to blend the repaired area seamlessly into the wall. Others might be harder and require more effort to achieve a smooth surface.
If your project demands a high level of finesse, look for spackling labeled as “easy to sand.” This characteristic can save time and effort, ensuring that you can paint over the repair without any visible imperfections. Additionally, be aware of the grit of sandpaper recommended for the spackling product you choose, as this can affect your final result.
4. Paintability
Another important consideration is the paintability of the spackling compound. Some formulations are designed specifically to be painted over easily, creating a smooth and uniform surface. Most premixed spacklings are paint-ready, but it’s wise to check the product specifications to ensure compatibility with your chosen paint type.
When repairing walls, it’s crucial that the spackling dries to a consistent color and texture so that the paint adheres correctly and delivers a professional finish. Test patches on a small area first can help determine how well the spackling takes paint, especially if you are working with dark or specialized colors.
5. Texture Matching
Matching the texture of repaired walls is essential for a successful finish, particularly in large areas or on textured surfaces. Many spackling products are designed to mimic the texture of the surrounding wall, providing smooth options alongside textured fillings. If you’re working with a heavily textured wall, look for compounds that are specifically designed for texture matching.
When purchasing spackling, consider buying a product sample to test the texture before committing to larger quantities. This will help ensure that your repair blends seamlessly with existing textures, delivering a polished and failsafe result once the wall is painted.
6. Packaging and Quantity
The way spackling products are packaged can significantly impact your purchasing decision. They come in various sizes, from small tubs perfect for minor repairs to larger containers ideal for extensive projects. An important consideration is the area you plan to cover and whether you require more than just a small tub for larger jobs.
Evaluate the product size in relation to your project needs and future repairs. If you often perform home maintenance, opting for larger sizes may provide better value over time. However, for one-off projects, a smaller container might suffice, reducing waste and managing costs effectively.
FAQ
What is spackling, and when should I use it?
Spackling is a type of paste used to fill in small holes, cracks, and imperfections in walls, ceilings, and other surfaces. It is primarily made of a binder, filler, and water, which together create a compound that can be easily applied and smoothed over damaged areas. You should use spackling when you need to repair minor damage, such as nail holes from hanging pictures, dents caused by furniture, or small cracks that may have developed due to settling or temperature changes.
Using spackling is recommended for both interior and exterior surfaces, although the formulation for exterior spackling may differ to withstand weather conditions. The ideal time to apply spackling is during your preparation phase of painting or wall finishing, as it allows you to create a smooth, even surface for better adhesion of paint or wallpaper. This ensures a professional-looking finish while extending the life of your wall treatments.
What types of spackling are available on the market?
There are several types of spackling compounds available, each designed for specific applications. The most common types include lightweight spackling, vinyl spackling, and epoxy spackling. Lightweight spackling is easy to apply, dries quickly, and is perfect for small repairs around the house. Vinyl spackling is more durable and resistant to cracking, making it suitable for larger repairs or high-humidity areas such as bathrooms.
Another type is epoxy spackling, designed for heavy-duty repairs. This compound is particularly useful for fixing damage on surfaces subjected to significant wear and tear, such as walls in garages or entryways. Additionally, you can find specialized spackling compounds, such as those that are stain-resistant or formulated for outdoor use, ensuring that you can choose the right product based on your needs and the conditions of the surfaces you are repairing.
How do I apply spackling properly?
Applying spackling is a straightforward process, but it requires some preparation for the best results. Start by cleaning the area around the damage to remove dust, dirt, and loose paint. If the hole or crack is deep, you may need to enlarge it slightly to create a better surface for the spackling to adhere. Next, use a putty knife to apply the spackling compound, pressing it firmly into the hole and smoothing out any excess. For smaller holes, a smaller knife or finger may suffice.
After applying the spackling compound, allow it to dry according to the manufacturer’s instructions. Once dry, you may need to sand the area lightly to create a smooth finish that is level with the surrounding surface. Be sure to do this gently to avoid damaging the surrounding area. Finally, you can paint over the repaired area once it is completely smooth and dry, making the repair virtually invisible.
How long does spackling take to dry?
The drying time of spackling can vary depending on the specific product, the thickness of the application, and the environmental conditions. Lightweight spackling products typically dry within one to two hours, making them convenient for quick repairs. However, thicker applications or products designed for heavy-duty repairs may take longer, ranging from four to six hours or more. Always check the instructions on the product label for precise drying times.
Keep in mind that humidity, temperature, and ventilation can influence drying times. In high humidity or cooler temperatures, the drying process may take significantly longer. To ensure the best results, allow adequate drying time before sanding or painting over the repaired area, as this will help prevent imperfections that could compromise the finish.
Can I paint over spackling?
Yes, you can paint over spackling, and it is often necessary to achieve a uniform finish. Once the spackling compound is completely dry and has been sanded to create a smooth surface, it can be painted over with either latex or oil-based paints. It is advisable to use a primer first, especially if the spackled area is large, as this will help the paint adhere better and provide a more even color across the entire surface.
Before painting, ensure that any dust from sanding is wiped away, as it can affect the adhesion of the paint. If you notice any imperfections after sanding, you may want to apply an additional layer of spackling and repeat the sanding process. Once satisfied with the smoothness of the area, proceed to apply primer and then your chosen paint for a seamless, professional finish.
How do I choose the best spackling for my project?
Choosing the best spackling for your project depends on several factors, including the size of the repair, the type of surface, and the environmental conditions. For small nail holes or minor cracks, lightweight spackling is usually sufficient. It is easy to work with, dries quickly, and is ideal for interior walls and ceilings. For more significant repairs or in areas with higher humidity, like bathrooms or kitchens, consider using vinyl or a moisture-resistant compound.
Additionally, it’s essential to consider the intended end result. If you plan to paint over the spackled area, choose a spackling compound that is easy to sand and will accept paint well. If you’re fixing drywall, opt for a specific drywall spackling compound that will adhere properly and create a durable repair. Always read reviews and product specifications to ensure that the spackling you choose meets your project’s requirements.
Are there any tips for preventing cracks in spackling?
To prevent cracks in spackling, it’s crucial to apply the compound correctly. Ensure that you are not applying it too thickly in one go, as thicker layers are more prone to cracking during the drying process. Instead, apply multiple thin layers, allowing each layer to dry fully before applying the next. This gradual approach allows for better adhesion and minimizes the risk of the compound shrinking as it dries, which can lead to cracks.
Another tip is to choose the right spackling compound for the job. Some formulations are specifically designed to be more flexible and resistant to cracking, particularly in areas that may expand or contract due to temperature changes. Additionally, avoiding painting or placing weight on the repaired area until the spackling has completely cured will help ensure durability and prevent future cracking.
Conclusion
In conclusion, finding the best spackling for your specific needs can significantly enhance your home improvement projects. Whether you’re tackling small repairs or larger renovations, a high-quality spackling compound ensures a smooth and durable finish that both DIY enthusiasts and professionals can appreciate. By considering factors such as drying time, texture, and ease of application, you can select a product that not only meets but exceeds your expectations.
Ultimately, investing in the best spackling is an essential step toward achieving flawless walls and surfaces. With our comprehensive reviews and buying guide, you are now equipped with all the essential information needed to make an informed decision. Choose wisely, and you’ll transform your space with confidence, knowing that you’ve selected a product that truly delivers on its promises.